Visual Studio “Duplicate ‘Content’ items were included” Fix

Recently migrated a project from one machine to another.  Original machine was running Visual Studio 2015 Professional, and the new machine Visual Studio 2017 Professional.  Once I grabbed the source code from our Git repo I could not longer build the project.  When I tried I received this error within Visual Studio:

“Duplicate ‘Content’ items were included. The .NET SDK includes ‘Content’ items from your project directory by default. You can either remove these items from your project file, or set the ‘EnableDefaultContentItems’ property to ‘false’ if you want to explicitly include them in your project file. For more information, see https://aka.ms/sdkimplicititems. The duplicate items were:”

error

There is an easy fix though!  Shorthand is, just “exclude” then “include” your “wwwroot” directory.  This will make the necessary changes to your project.  I included step by step instructions below.

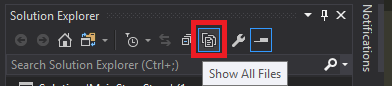
Step 1: Show all files in Visual Studio

Within in Visual Studio, inside your Solution Explorer tab you’ll want to enable “Show All Files”.  This will help you re-include the “wwwroot” directory later on.

Step1

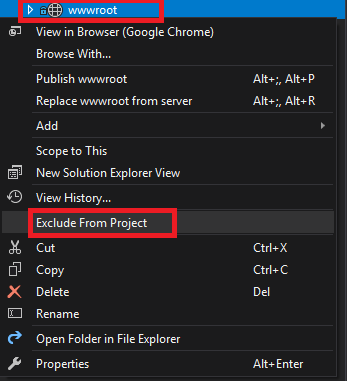
Step 2: Exclude “wwwroot” folder from your project

Step2

Step 3: Include “wwwroot” folder in your project

Step3

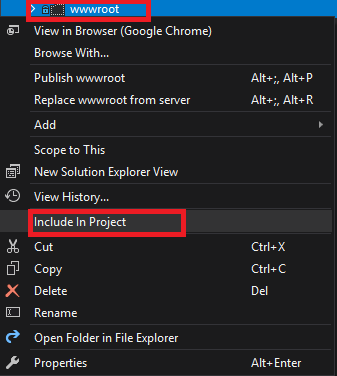
That’s it!  You should be able to re-build your project now.

.NET Authentication In WebAPI 2 With Cross Domain Support

Recently I had a project requirement to create a .NET WebAPI 2 project that supported authentication as well as cross domain support (CORS / Cross-Origin Resource Sharing).  This will allow external domains to POST requests to the authentication API, and we will return an OAuth token that can be used in later WebAPI requests.

All .NET code examples below are in C#.

First start a new “ASP.NET Web Application” project.  Select the “WebAPI” template, and make sure “Individual User Accounts” is selected.

Second, use NuGet to install the following packages:

  • Microsoft.AspNet.Cors
  • Microsoft.AspNet.WebApi.Cors
  • Microsoft.Owin.Cors

These packages will enable you to configure CORS for API and Owin calls.

Under “App_Start/Startup.Auth.cs” inside the function “ConfigureAuth” add this line of code to the top of the function (yes, having it be the first line is very important).

public void ConfigureAuth(IAppBuilder app)
{
    // Allow cross domain authentication requests
    app.UseCors(Microsoft.Owin.Cors.CorsOptions.AllowAll);

    // ..... The rest of the code for the function goes below here

Please note, this line will allow requests from ANY external domain. If you want to lock down which domains have rights to post to the authentication API you’ll need more configuration at this point. Typically you will NOT want requests from any domain, and will have a list of accepted domains.

Your login URL will be “/Token”. This can be adjusted in “App_Start/Startup.Auth.cs” where “OAuthOptions” is defined. Specifically the “TokenEndpointPath” is the parameter that controls the route.

When POST’ing to “/Token” you’ll send three parameters.  The “grant_type” is a static string which will be set to “password”.  The “username” and “password” parameters will be the username and password you are attempting to authenticate with.

var loginData = {
    grant_type: 'password',
    username: 'yourusername',
    password: 'yourpassword'
};

If your POST is successful, the response will contain an “access_token”. For all future WebAPI calls you’ll want to set an “Authorization” header to “Bearer ” followed by your access_token you received from your initial login.

Here are some resources that helped me with my project!

Sample .NET C# WebAPI project with local individual accounts.
http://www.asp.net/web-api/overview/security/individual-accounts-in-web-api

Explanation of posting form data in AngularJS
http://www.bennadel.com/blog/2615-posting-form-data-with-http-in-angularjs.htm